Walkthrough 2: Using cox with tensorboardX
Note: As with the first walkthrough, a working example file with all of these commands can be found here
Here, we’ll show how to use cox and tensorboardX in unison for logging.
We’ll use the following simple running example:
from cox.store import Store

for slope in range(5):
    s = Store(OUT_DIR) # Create OUT_DIR/RANDOM_UUID
    s.add_table('line_graphs', {'mx': int, 'mx^2': int})
    s.add_table('metadata', {'slope': int})
    s['metadata'].append_row({'slope': slope})

 # GOAL: plot and log the lines "y=slope*x" and "y=slope*x^2"
As previously mentioned, cox.store.Store objects also automatically creates a
tensorboard folder that is written to via the
tensorboardX
library. A created cox.store.Store object will actually expose a writer property
that is a fully functioning
SummaryWriter
object. That means we can plot the lines we want in TensorBoard as follows:
for x in range(10):
    s.writer.add_scalar('line', slope*x, x)
    s.writer.add_scalar('parabola', slope*(x**2), x)
Unfortunately, TensorBoard data is quite hard to read/manipulate through means
other than the TensorBoard interface. For convenience, the
Store object also provides the ability to write to a table
and the tensorboardX writer at the same time through the cox.store.Store.log_table_and_tb()
function, meaning that we can replace the above with:
# Does the same thing as the example above but also stores the results in a
# readable 'line_graphs' table
for x in range(10):
    s.log_table_and_tb('line_graphs', {'mx': slope*x, 'mx^2': slope*(x**2)})
    s['line_graphs'].flush_row()
Viewing multiple tensorboards with cox.tensorboard_view
Note: the python3 -m cox.tensorboard_view command can be called as
cox-tensorboard **from the command line
Continuing with our running example, we may now want to visually compare
TensorBoards across multiple parameter settings. Fortunately, cox
provides utilities for comparing TensorBoards across experiments in a readable
way. In our example, where we made a Store object and a table
called metadata where we stored hyperparameters. We also showed how to
integrate TensorBoard logging via tensorboardX. We’ll now use the
cox.tensorboard_view utility to view the tensorboards from multiple jobs at
once (this is useful when comparing parameters for a grid search).
The way to achieve this is through the cox.tensorboard_view command, which is
called as python3 -m cox.tensorboard_view with the following arguments:
--logdir: (required)- the directory where all of the stores are located
--port(default 6006)- the port on which to run the tensorboard server
--metadata-table(default “metadata”)- the name of the table where the hyperparameters are saved (i.e. “metadata” in our running example). This should be a table with a single row, as in our running example.
--filter-param(optional)- Can be used more than once, filters out stores
from the tensorboard aggregation. For each argument of the form
--filter-param PARAM_NAME PARAM_REGEX, only the stores wherePARAM_NAMEin the metadata matchesPARAM_REGEXwill be kept. --format-str(required)- How to display the name of the stores. Recall
that each store has a
uuid-generated name by default. This argument determines how their names will be displayed in the TensorBoard. Curly braces represent parameter values, and the uuid will always be appended to the name. So in our running example,--format-str ss-{step_size}will result in a TensorBoard with names of the formss-1.0-ed892c4f-069f-4a6d-9775-be8fdfce4713.
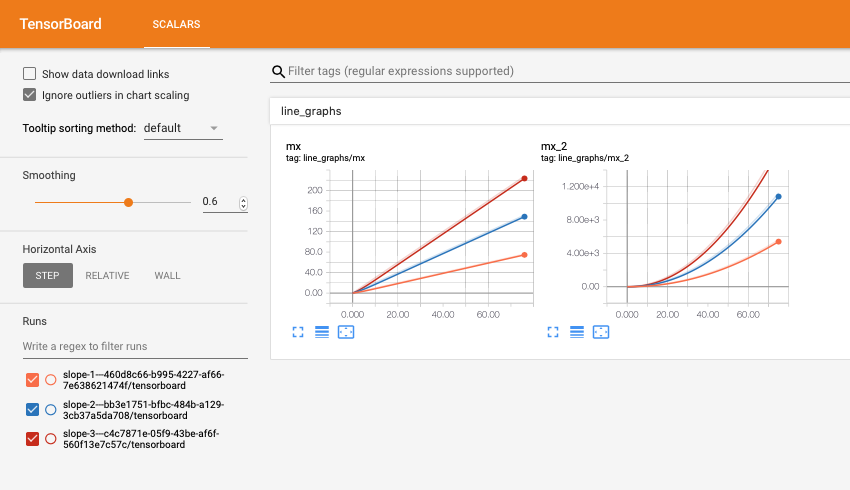
So in our running example, if we run the following command, displaying the slope in the TensorBoard names and filtering for slopes between 1 and 3:
python3 -m cox.tensorboard_view --logdir OUT_DIR --format-str slope-{slope} \
    --filter-param slope [1-3] --metadata-table metadata
or:
cox-tensorboard --logdir OUT_DIR --format-str slope-{slope} \
    --filter-param slope [1-3] --metadata-table metadata
then navigating to localhost:6006 yields:
